
The best way to prep interior walls for painting is to inspect the condition of the walls first, then clean, repair, sand, caulk, and prime only where necessary. The amount of preparation should depend on the actual condition of the interior walls rather than applying the same prep process to every room.
This is especially important throughout the New York tri-state area, where interior painting projects can range from older New York City apartments with years of previous repairs and paint to newer homes on Long Island, New Jersey, and Connecticut with relatively smooth drywall.
Good interior wall preparation isn’t about doing the most work. It’s about doing the right work for the surface you’re painting.
Start by Determining the Condition of Your Interior Walls
Before deciding how to prep interior walls for painting, inspect them carefully.
Look for:
- Nail, screw, and anchor holes
- Dents and gouges
- Drywall damage
- Hairline or larger cracks
- Rough previous patches
- Loose or peeling paint
- Raised paint drips
- Failed caulk
- Stains or discoloration
- Grease and dirt
- Bare drywall or joint compound
- Glossy or slick existing finishes
The condition of the walls determines what comes next.
A clean bedroom with several nail holes doesn’t need the same preparation as an apartment turnover with dozens of holes, damaged drywall, cracks, and previous repairs.
The Best Prep for Interior Walls in Good Condition
If the existing interior paint is sound and the walls are relatively smooth, preparation can be fairly straightforward.
Remove wall decorations and hardware, protect the room, remove dust or dirt where necessary, fill nail and screw holes, sand the repairs smooth, and inspect the walls for anything else that could show through the new paint.
Spot prime repaired areas when appropriate.
There’s usually no benefit in turning a simple interior painting project into an extensive wall restoration when the existing surfaces are already in good condition.
The Best Prep for Walls With Nail and Anchor Holes
Nail, screw, and wall-anchor holes are some of the most common problems encountered during interior painting.
They’re particularly common in apartments and rental properties where pictures, televisions, shelves, curtain hardware, and decorations have been installed and removed.
Fill the holes with an appropriate patching material and allow the repair to dry. Sand the patch so it transitions smoothly into the surrounding wall, remove the dust, and prime the repaired area when necessary.
Don’t focus only on filling the hole.
A poorly feathered patch can be more noticeable after painting than the original hole.
The Best Prep for Interior Walls With Dents and Gouges
Dents and gouges should be repaired before painting if you don’t want them visible afterward.
Shallow imperfections may need only a small amount of patching material. Deeper damage may require more extensive filling or drywall repair.
After the repair dries, sand it smooth and inspect it from several angles.
Interior lighting matters. A repair that looks fine straight ahead can become obvious when sunlight from a window or artificial lighting travels across the wall.
The Best Prep for Previously Patched Walls
Previous wall repairs are not always smooth enough to simply repaint.
Run your hand across existing patches and inspect them under side lighting. Look for raised edges, sanding scratches, depressions, excessive compound, and differences in texture.
Correct rough or uneven repairs before applying new interior paint.
This can be particularly important in older apartments and rental properties that have been patched repeatedly between occupants.
Adding another coat of paint doesn’t necessarily make a poor previous repair disappear.
The Best Prep for Cracked Interior Walls
Cracks require more judgment than ordinary nail holes.
A small cosmetic crack may be repairable during normal wall preparation. A recurring, widening, or unusual crack may indicate something that should be investigated before it is simply filled and painted.
Older properties throughout New York City and other established tri-state communities may have interior surfaces that have been repaired numerous times.
If a crack has returned through previous repairs, simply applying another layer of patching material may not provide a lasting cosmetic correction.
The Best Prep for Damaged Drywall
Damaged drywall should be properly repaired before interior painting begins.
Small damaged areas may be handled with ordinary patching techniques. Larger holes can require a drywall patch, reinforcement, joint compound, multiple applications, sanding, and primer.
The repaired area should transition smoothly into the surrounding wall.
If substantial drywall preparation is required, our wall surface prep services can handle common repairs and get the interior surfaces ready for painting.
The Best Prep for Peeling Interior Paint
Loose or peeling paint should not simply be covered with another coat.
Remove unstable material and determine whether there’s an underlying reason for the failure.
Once loose material has been removed, the edges may need sanding, patching, or other preparation to create a smoother transition into the surrounding painted surface.
If moisture or another ongoing condition is causing the paint to fail, address that problem before repainting.
New paint cannot permanently correct a problem underneath the surface.
The Best Prep for Dirty or Greasy Interior Walls
Not every interior wall needs intensive washing before painting.
The key is determining whether anything on the surface could interfere with the new coating.
Kitchen walls can accumulate grease and cooking residue. Hallways and areas around doors and switches can collect dirt and oils. Other rooms may simply have light dust.
Clean according to the condition of the wall.
Allow washed surfaces to dry thoroughly before continuing with primer or interior paint.
The Best Prep for Glossy Interior Walls
Glossy or slick surfaces can require additional preparation because the new coating needs a suitable surface to bond to.
Depending on the existing finish and the coating being applied, this can involve cleaning, appropriate sanding or deglossing, and primer when required.
The objective is not simply to make the wall look dull.
It’s to create a properly prepared surface for the next coating.
The Best Prep for Newly Repaired Drywall
Joint compound and other porous repairs can absorb paint differently from the surrounding previously painted wall.
Once repairs are completely dry and properly sanded, remove the sanding dust and prime the repaired areas as appropriate.
This helps seal the repair before applying the finish paint.
If repairs cover much of the wall, broader priming may make more sense than treating numerous individual spots.
Should You Prime Every Interior Wall Before Painting?
No. Priming every previously painted interior wall isn’t automatically necessary.
Primer is most useful when it has a specific job to perform.
That can include sealing new drywall or repairs, addressing certain stains, preparing bare or porous surfaces, helping with significant color changes, or dealing with other surfaces requiring a particular primer.
If the existing interior paint is sound and compatible with the new coating, full-wall priming may not be necessary.
The best approach is to determine why primer would be needed before deciding how much to use.
How Much Should You Sand Interior Walls Before Painting?
Sand enough to correct the conditions that require sanding.
This can include:
- Drywall patches
- Rough repairs
- Paint drips
- Scraped edges
- Raised imperfections
- Certain slick surfaces
That doesn’t mean every previously painted interior wall requires aggressive sanding from ceiling to floor.
Unnecessary sanding adds labor and dust without necessarily improving a wall that’s already in good condition.
Why Wall Preparation Can Be Different in New York City Apartments
Interior painting in New York City can involve a wide range of wall conditions.
Apartments in Manhattan, Brooklyn, Queens, and the Bronx may have been occupied, repaired, and repainted many times. Walls can contain numerous anchor holes, previous patches, cracks, old paint edges, and other evidence of earlier work.
Space can also affect preparation. In smaller apartments, furniture may need to be moved and protected within the same room rather than removed completely.
Apartment turnovers can create another type of prep project, with numerous minor repairs needed throughout the property before new occupants move in.
The age and condition of the individual apartment matter more than simply following a generic wall-prep checklist.
Preparing Interior Walls in Long Island Homes
Long Island interior painting projects often involve multiple rooms throughout a house.
Bedrooms may need only minor preparation while hallways and stairways contain dents and scuff damage. Kitchens can require additional cleaning. Living rooms may have holes from mounted televisions or shelving.
Instead of assuming the entire house requires the same preparation, inspect each room separately.
This can reduce unnecessary work while allowing more attention to the surfaces that actually need it.
Interior Wall Preparation in New Jersey and Connecticut
The same principle applies to houses, apartments, rental properties, offices, and commercial interiors throughout New Jersey and Connecticut.
Property type, age, previous painting, and wall condition determine the preparation.
A newer suburban house with smooth drywall presents a very different project from an older apartment or commercial space that has undergone numerous repairs and repainting cycles.
That’s why the best interior wall preparation method begins with the surface rather than the ZIP code.
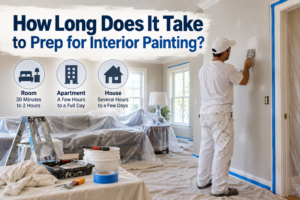
How Long Should Interior Wall Preparation Take?
There isn’t one preparation time that applies to every interior painting project.
A room with walls in good condition may require relatively little preparation. Damaged drywall, numerous patches, peeling paint, cracks, extensive sanding, or primer can add considerably more time.
Drying time between repairs, primer, and other stages can also affect the schedule.
For a more detailed breakdown, see How Long Does It Take to Prep for Interior Painting?
How Much Does Interior Wall Prep Cost?
The cost depends largely on the condition of the walls and the amount of painter time required.
A few nail holes and minor patches represent a very different amount of work from repairing drywall and preparing damaged surfaces throughout an apartment, house, or commercial space.
For a detailed explanation, see How Much Does It Cost to Prep for Interior Painting?
Hire Professional Painters for Interior Wall Preparation
Painters For A Day provides professional painters for hire for interior wall preparation and painting throughout New York City, Long Island, and surrounding areas of the New York tri-state region.
Our painters work in apartments, houses, rental properties, offices, and commercial interiors. Depending on the project, they can handle common preparation such as patching minor drywall damage, filling holes, scraping, sanding, caulking, and preparing interior surfaces before painting.
Our crews arrive fully equipped with painting tools and equipment along with basic supplies to prepare and protect the work area.
You simply get the paint and point at what you’d like painted; our reliable crew will take care of the rest.
The Best Interior Wall Prep Depends on the Surface
There isn’t one preparation method that’s best for every interior wall.
Good walls need less. Damaged walls need more. Different problems require different preparation.
The best way to prep interior walls for painting is to inspect them first and then address the conditions you actually find. Clean where necessary, repair damage, smooth rough areas, remove unstable paint, caulk appropriate gaps, and use primer where it serves a specific purpose.
Whether you’re preparing an apartment in New York City, a house on Long Island, or an interior elsewhere in the tri-state area, the goal remains the same: create a clean, sound, properly prepared
1 Comment
Hire Painters in New York Now
Check Out Our Prices And Get Started Today!

[…] prep interior walls for painting and priming, inspect the walls first, protect the room, clean surfaces where necessary, repair […]