
To prep interior walls for painting and priming, inspect the walls first, protect the room, clean surfaces where necessary, repair holes and drywall damage, scrape loose paint, sand rough areas, remove sanding dust, caulk appropriate gaps, and prime surfaces that require it before applying interior paint.
The exact amount of interior wall preparation depends on the condition and age of the property. A newer Long Island house with relatively smooth drywall may need only minor preparation, while an older New York City apartment may have cracks, numerous previous patches, layers of paint, damaged drywall, and other imperfections that require considerably more attention.
Throughout New York, New Jersey, and Connecticut, the basic objective is the same: create a clean, sound, properly prepared interior surface before the finish paint is applied.
Step 1: Inspect the Interior Walls
Before filling holes or opening a can of primer, inspect the interior walls throughout the room.
Look for:
- Nail and screw holes
- Wall anchors
- Dents and gouges
- Hairline and larger cracks
- Damaged drywall
- Loose or peeling interior paint
- Rough previous patches
- Raised paint drips
- Separated or failing caulk
- Water stains or discoloration
- Grease and surface contamination
- Glossy or slick areas
- Bare drywall or exposed joint compound
Look at the walls from different angles and under good lighting. Light traveling across an interior wall can reveal dents, raised patches, poor previous repairs, and other imperfections that aren’t as noticeable when looking directly at the surface.
Run your hand across questionable areas as well. A repair can appear smooth while still having a raised edge that becomes noticeable after the room is painted.
Step 2: Clear the Interior Work Area
Remove pictures, mirrors, decorations, and other items attached to the walls.
Move smaller furniture and belongings out of the immediate work area. Larger furniture that cannot reasonably be removed can usually be moved toward the center of the room.
In smaller New York City apartments, completely emptying a room isn’t always practical. The important thing is to provide enough access around the walls for patching, sanding, priming, cutting in, and painting.
Remove switch and outlet covers where appropriate rather than trying to paint around them.
Step 3: Protect Floors, Furniture and Interior Surfaces
Before beginning wall repairs, protect the rest of the room.
Use appropriate floor coverings and protect furniture that remains in the space. Depending on the room, countertops, cabinets, fixtures, appliances, doors, and other finished surfaces may also need protection.
This is particularly important during interior wall preparation because patching, scraping, and sanding can create debris and dust before the actual painting even begins.
Proper interior painting prep means protecting the property as well as preparing the walls.
Step 4: Clean Interior Walls Where Necessary
Interior walls should be free from contaminants that can interfere with paint or primer adhesion.
However, not every wall needs the same level of cleaning.
Bedroom and living-room walls may need little more than dust removal. Kitchen walls can accumulate grease and cooking residue. Bathrooms can develop different types of buildup, while areas around switches, doors, and hallways can accumulate oils and dirt from frequent contact.
Clean according to the condition of the surface rather than automatically treating every interior wall the same.
If the walls are washed, allow them to dry before moving on to repairs, primer, or paint.
Step 5: Fill Nail Holes, Anchor Holes and Small Dents
Interior walls often accumulate minor damage simply from normal use.
Pictures, shelving, televisions, curtain hardware, and wall-mounted furniture can leave nail holes, screws, anchors, and other marks behind.
This is particularly common during apartment turnovers in Manhattan, Brooklyn, Queens, and the Bronx, where walls may have been used and modified by multiple occupants.
Fill minor holes and dents with an appropriate patching material. Once dry, sand the repair so that it transitions smoothly into the surrounding wall.
Avoid creating an unnecessarily large patch around a small hole. A raised patch can remain visible after the interior wall is painted.
Step 6: Repair Damaged Interior Drywall
Larger holes, cracks, dents, and damaged drywall require more involved preparation.
Depending on the damage, repairs may require patching, joint compound, reinforcement, multiple applications, drying time, and sanding.
Older interiors can present additional challenges. Apartments and houses that have been painted repeatedly may contain old repairs underneath several generations of paint. These repairs may need to be corrected rather than simply covered again.
If the interior walls have widespread damage or require more preparation than you want to handle yourself, our wall surface prep services can take care of common wall preparation and repairs before interior painting begins.
Step 7: Address Cracks Before Interior Painting
Cracks shouldn’t automatically be treated like nail holes.
Small cosmetic cracks may be relatively straightforward to repair, while recurring or larger cracks can require closer evaluation.
Older buildings throughout New York City and other parts of the tri-state area can have interior surfaces that have moved, settled, or been repaired numerous times over the years.
Simply filling a recurring crack and painting over it doesn’t necessarily address why it keeps returning.
Determine the nature of the crack before deciding how it should be repaired.
Step 8: Scrape Loose or Peeling Interior Paint
If the existing interior paint is loose, flaking, or peeling, don’t simply cover it with another coat.
Remove unstable material until you reach a sounder edge.
The transition between the scraped area and surrounding paint may then require sanding or patching to prevent the edge from showing through the new finish.
New interior paint is only as secure as the surface underneath it.
If widespread peeling appears to be associated with moisture or another continuing condition, that problem should be addressed before repainting.
Step 9: Sand Repairs and Rough Interior Surfaces
Once repairs have dried, sand them as needed.
Sanding can smooth patching compound, flatten old paint drips, soften the edges of scraped areas, and correct rough previous repairs.
You don’t necessarily need to aggressively sand every square foot of every previously painted interior wall.
Concentrate on the areas that need correction and surfaces requiring additional preparation for proper adhesion.
After sanding, run your hand across repaired areas. You shouldn’t feel an obvious ridge where the patch meets the surrounding wall.
Step 10: Remove Interior Sanding Dust
Sanding creates fine dust that can settle on walls, trim, baseboards, floors, windowsills, and other surfaces.
Remove this dust before applying primer or interior paint.
Otherwise, you’re applying the next coating over loose sanding residue rather than directly onto the prepared wall.
This becomes especially important when extensive drywall repairs or sanding have been completed throughout an apartment or house.
Step 11: Caulk Appropriate Interior Gaps
Inspect areas where interior walls meet painted trim.
This can include baseboards, door casings, window trim, crown molding, and other painted transitions.
Small appropriate gaps can often be filled with paintable caulk to produce a cleaner finished appearance.
Old caulk that has separated or failed may need to be corrected first.
Caulk isn’t a substitute for drywall repair. Use it for the types of joints and transitions it is designed to address.
Step 12: Determine Whether the Interior Walls Need Primer
Not every previously painted interior wall needs a complete coat of primer.
Primer should serve a purpose.
Interior walls may require primer when you’re dealing with:
- New drywall
- Exposed drywall paper
- Joint compound
- Drywall repairs
- Bare or porous surfaces
- Certain stains
- Significant color changes
- Questionable adhesion
- Areas requiring stain blocking
- Other problem surfaces requiring specialized treatment
A Long Island bedroom with sound previously painted walls may need very little primer. An older Manhattan apartment containing numerous repairs and exposed compound may require significantly more.
The condition of the surface should determine the priming strategy.
Step 13: Spot Prime Interior Wall Repairs When Appropriate
Patching compounds and joint compound can absorb finish paint differently from the surrounding painted surface.
Spot priming appropriate repairs helps seal those areas before the finish paint is applied.
If there are only several isolated repairs, spot priming may be sufficient.
When repairs cover substantial portions of the walls, a broader priming approach may make more sense.
Again, the surface should determine the treatment.
Step 14: Prime the Entire Interior Wall When Necessary
There are situations where priming the entire wall or room is appropriate.
New drywall is one example. Widespread repairs, certain stains, significant color changes, and some questionable existing surfaces may also justify full priming.
The correct primer depends on what you’re trying to accomplish.
A primer intended to seal porous drywall repairs isn’t necessarily the same product you would select to address a difficult stain or another specialized surface condition.
Don’t ask only, “Do these walls need primer?”
Ask, “What problem does the primer need to solve?”
Step 15: Inspect the Interior Walls Again
Before applying the finish paint, inspect the walls one more time.
Primer and changing light conditions can reveal imperfections that weren’t obvious earlier.
Look for remaining pinholes, dents, scratches, rough patches, visible repair edges, and other surface defects.
Correcting these imperfections now is considerably easier than discovering them after the finish coat has dried.
Step 16: Begin Interior Painting
Once the walls are clean, sound, properly repaired, smooth enough for the desired finish, free from sanding dust, and primed where necessary, they’re ready for interior painting.
At this stage, the finish paint isn’t being asked to conceal wall damage or compensate for incomplete preparation.
The surface underneath has already been prepared to receive it.
How Should You Prep Older New York City Apartment Walls?
Older New York City apartments can require more preparation because the walls may have been patched, repaired, and repainted numerous times.
Properties in Manhattan, Brooklyn, Queens, and the Bronx can contain everything from relatively modern drywall to much older interior wall systems.
You may encounter old patches, accumulated paint edges, cracks, nail and anchor holes, rough repairs, or surfaces that aren’t as uniform as those found in newer construction.
The solution isn’t automatically to sand everything or cover everything with primer.
Inspect the existing surface first and correct the specific problems that could affect the new interior paint.
How Should You Prep Interior Walls in Long Island Houses?
Long Island houses often present a different type of interior painting project.
Instead of one apartment, the project may involve bedrooms, living rooms, dining rooms, kitchens, hallways, stairways, basements, and other areas throughout the house.
Some rooms may be nearly ready for paint while others need substantial preparation.
Evaluate rooms individually. Don’t assume that because one bedroom requires minimal prep, the hall, stairway, kitchen, or living area will be the same.
What About Interior Wall Prep in New Jersey and Connecticut?
The same preparation principles apply to interior painting projects in New Jersey and Connecticut, but property age, construction type, previous repairs, and wall condition can vary considerably.
Whether you’re dealing with a house, apartment, rental property, office, or commercial interior, preparation should be based on the actual surface rather than geography alone.
The tri-state context matters because the region contains a wide mixture of older buildings, newer construction, apartments, suburban houses, rental properties, and commercial spaces.
There is no single prep routine appropriate for all of them.
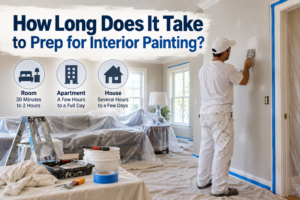
How Long Does Interior Wall Prep Take?
Interior wall preparation can take anywhere from a relatively short portion of the project to several hours or longer when extensive repairs are involved.
Drying time can also extend the process when patching compounds, joint compound, caulk, or primer are required.
For a detailed breakdown, see How Long Does It Take to Prep for Interior Painting?
How Much Does Interior Wall Preparation Cost?
The cost of interior wall prep depends primarily on the amount of labor and repair work required.
A room needing only basic protection, several patches, and light sanding has a very different labor requirement from an apartment or house containing extensive drywall damage and numerous repairs.
For more detail, see How Much Does It Cost to Prep for Interior Painting?
Hire Professional Painters for Interior Wall Prep
If you would rather have the preparation and painting handled for you, Painters For A Day provides professional painters for hire throughout New York City, Long Island, and surrounding parts of the New York tri-state area.
We work on residential and commercial interiors, including apartments, houses, rental properties, offices, and commercial spaces.
Our painters arrive equipped with painting tools and equipment along with basic supplies to prepare and protect the work area. Depending on the project, painter time can be used for common preparation such as patching minor drywall damage, filling holes, scraping, sanding, caulking, and getting interior surfaces ready for paint.
You simply get the paint and point at what you’d like painted; our reliable crew will take care of the rest.
Proper Interior Painting Starts With Proper Wall Preparation
The basic sequence is straightforward: inspect the interior walls, protect the room, clean where necessary, make the appropriate repairs, scrape unstable material, sand rough areas, remove the dust, caulk appropriate gaps, prime where needed, inspect again, and then paint.
What changes from one property to another is the amount of work required at each stage.
Whether you’re painting an apartment in New York City, a house on Long Island, or another property in New Jersey or Connecticut, the best preparation plan is the one based on the actual condition of the interior walls you’re about to paint.
1 Comment
Hire Painters in New York Now
Check Out Our Prices And Get Started Today!

[…] deciding how to prep interior walls for painting, inspect them […]